Showing posts with label photoshop tutorial. Show all posts

Friday, May 23, 2014

DIY Design: Make an Ikat Pattern in Photoshop

I am so. ready. for chevron to be done. Everything is chevron these days (and um, should totally be passe since it's been around for like four years now) and I'm so not into it. I've taken to unfollowing anyone on Pinterest who repins anything chevron because you know what, I just can't handle that kind of a mess in my life. 

You know what I do like? Ikat. I sure don't know how to pronounce it (eye-cat? ee-cot?) but I know I like it. Let's make it dudes. 

1. Open up a new canvas, whatever size you want the repeatable square of your pattern to be. I went with 200x200. If you want a smaller pattern, go with 100 or 150 square. And if you want a bigger pattern...yeah you get it.

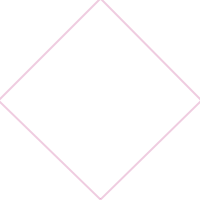
2. In a new layer, use the rectangle tool (but pick the straight line setting) to draw lines between all of the centers of your square's sides, like so, to create a diamond shape.


3. In your toolbar, find a brush that's kind of uneven looking. Pick a color. Draw straight lines up and down inside your diamond, but keep them loose. No need to stay inside the lines.


4. Pick another color and do the same thing, but in a smaller, imaginary diamond shape inside your diamond.

5. Now, go into Filter>>Other>>Offset and change the adjustments until you have your design evenly in four corners, like so.


6. OPTIONAL. Use your secondary color to draw another little diamond in the white space. Save by choosing Edit>>Define Pattern.


7. Open up a new canvas, aaaaany size you want. Press shift+F5 (fill) and select 'Use pattern'. Under the pattern options, click the mini square with your pattern and watch it fill up the space! How lovely! :)

If you liked this tutorial, I'd love if you would pin the top image or share it. 

P.S. You might also like my quick tutorial on making patterned text in Photoshop.

Wednesday, February 19, 2014

How to Create Patterned Text in Photoshop

Things have gotten a bit calmer around these parts + I've had some oh-so-appreciated time to sit down + design, just for fun. I'm always a fan of word art + I've been combining that with my major inspiration as of late: patterns. 

I really fell in love with bright, vibrant patterns about a year ago, when I bought this beautiful skirt from the Liberty London line at J.Crew in Boston. Lately, I've been especially inspired by these bright patterns + using photoshop to create patterned text quotes (which I'll teach you how to do below!)

And with one really simple tool in Photoshop, you can make one of those patterns into this:

Isn't that cool? And it's really, really easy. Open up a new Photoshop file, with the dimensions that you want. I set 760 as the width (because that's the width of my blog) and 300 pixels as the height. You can always crop it down later! Press 'T' or the Text Button on the left hand command dock (it's a capital letter T). Click anywhere on your page and type out your quote, fixing the size to look all nice. Then, go to your 'layers' panel, click the little arrow at the top right and click "New Layer". In this layer, insert your pattern and click the little check at the top if it pops up. Then, all you have left to do is right-click on that layer with the pattern in it + click 'create clipping mask'.

That's all there is to it! I hope you have fun with this tutorial! If you make anything using this tutorial, I'd love if you'd send me a link, either in the comments or via email.

What inspires you to make art?